Friday, December 28, 2012

Scalp Scrub

Confession: ever since John was born, for some reason, my scalp has been super and inexplicably gunky. I wash and wash, and brush and brush, and even scrape my scalp with my fingernails in the shower to try to get the gunk off, but it doesn't really help. Then, I read about a scalp treatment that worked miracles for my scalp.

Step 1: microwave 1/4 cup conditioner for 20 seconds
Step 2: mix in 1/4 cup Epsom salt and stir well
Step 3: shampoo and rinse as normal
Step 4: massage mixture into scalp and down hair shaft
Step 5: leave to soak in while you finish your shower routine
Step 6: rinse well


I was amazed to see how clean my scalp was and my hair was soft and voluminous. I wouldn't recommend doing this very often because the Epsom salt can dry out your hair, but if your scalp is feeling oily and flakey and your hair is looking limp and lifeless, I would definitely recommend this treatment.

Wednesday, November 14, 2012

Big Changes with the Johansen Family

If you are lucky enough to be my friend on Facebook ;) you may already know this exciting news. If not your hearing it from the horse's mouth. 

The Johansen family will become a family of 4 in March 2013. 

I know what your all thinking..."oh so that is why you went MIA for like 4 months". 

And yes you would be exactly correct. When I get pregnant I get sick. Like I cant get off the couch sick. I also go to bed like insanely early because if I stay up late I end up seeing my dinner, not one of my favorite things to do.

But now that a few months have passed and I have hit the all exciting 22 week mark we are getting really excited. We have started talking baby names (don't ask we have a REALLY hard time finding ones we both agree on) and speculating what it will look like. I bet if it knows whats good for it, it will look just like its sister (and that's a pretty good thing!).We have opted on not finding out the gender so it is likely that lots of baby crafts will be finding themselves on this blog for both boys and girls. 

Wish us luck on this new exciting change in our lives.

Mallory

Monday, November 12, 2012

Ranch Chicken

One of my friends just had a baby and we provided them dinner. I made my delicious Ranch Chicken. Its easy and one of my favorite crock pot meals! Serve shredded or whole on top of rice.

Ranch Chicken
5-7 Chicken Breasts
8oz Cream Cheese
1 Can Cream of Mushroom Soup
1 Packet Ranch Dressing Mix

Cook on low in crock pot for 6 to 8 hours.

I hope you love this recipe as much as we love it!

Mallory

Friday, November 9, 2012

Taco Soup

My mom has been making this delicious (and oh so easy taco soup for the last few years). Its one of my favorite go to recipes because it is so easy. This recipe does need a packet of Ranch Dressing Mix. It is the "salad dressing and seasoning mix". I have found that this one works better than any other I have tried. 


 Taco Soup

1 lb Chicken, cut into bite sized pieces and browned in olive oil
Add 1 packet of Taco Seasoning Mix
1 1/2 C. Water
1 Can Pinto Beans
1 Can Mild Chili Beans
1 Can Stewed Tomatoes 
1 Can Diced Tomatoes
1 Packet of Hidden Valley Seasoning Mix
1 Green Pepper cut into bite-sized pieces

Simmer for 30 minutes or on high in Crock pot for 1 1/2 hours.
Serve with Sour Cream and grated cheese.

Note: My family doesn't like green peppers so I leave that out.

Enjoy your quick and easy meal!

Mallory

Wednesday, November 7, 2012

Cake Decorating

Over the last year and a half I have become interested in cake decorating. Here are a few of my cakes for your viewing pleasure. I hope that it inspires you to make a few of your own delicious and good looking cakes.
 Minnie cake done with a Mickey Mouse cake pan and then decorated like Minnie. Tips used Wilton Star tip.
 Spider's done with ball cake pan and then only put half of the cake for each spider.

 Caterpillar made with cake cut out by cookie cutter.

 Caterpillar pieces made with ball cake pan and then cut to match together.

Friday, November 2, 2012

Fancy Little Girl Hair Do

Morgan and I got bored one day so we decided to find another way to do her hair. She loved having the hair out of her eyes for a bit. She hated having us take the elastics out. In this hair I just did two rows of connected ponytails. It looked super cute with a bow by the ponytail. 

Enjoy your hair doing! 

Mal

Wednesday, October 31, 2012

Brains Anyone?

 My husband had a work Halloween party this week. It was a Chili cook-off and since I don't have any good chili recipes I decided to make these cupcakes. I found these on Pinterest and decided to make them. I decided these turned out pretty good. We did a pink/grayish frosting and looked so much better in person.
I figured this was a good time to post my mother-in-law's frosting recipe. She originally got this recipe from Wilton but I have been unable to find it there. Here it is:

Buttercream Frosting

1 C. Salted Sweet Cream Butter
1 C. Shorting 
6 C. Powdered Sugar
1 1/2 t. Lemon Flavoring
1 1/2 t. Vanilla Flavoring

Mix well and decorate your desired items. 

Note: you can substitute the Lemon flavoring for any other flavor you like (Almond). I would expect other things would work out.

Enjoy this recipe and decorate your cupcakes, cakes, and such!

Mal

Tuesday, October 30, 2012

Hey Ya'll!

So we have jumped back on the blogging bandwagon. Watch the blog for cute ideas for desserts, food, and more!

Wednesday, July 18, 2012

Cafe Rio Chicken Salad

Like most born and breed Utahns I love Cafe Rio. Luckily my husband loves it too. We have loved the pork in the past but when pinterest gave me this recipe I thought I would try it out.

CAFE RIO CHICKENfound recipe at: Mandy’s Recipe Box:
2 lbs chicken breasts
1/2 a small bottle of zesty Italian dressing
1/2 Tbsp. minced garlic
1 pkt ranch dressing mix (mixed with 1/2 cup of water)
1/2 Tbsp. chili powder
1/2 Tbsp. ground cumin
Place all ingredients in a crock pot. Cook on High 5-6 hours OR on Low 8 hours. Shred with fork and serve in salads, burritos, tacos…etc. You can also double or triple this to make extras for freezing. Then simply thaw and reheat for a fast and delicious meal.Enjoy

I got the dressing recipe from here
 Cafe Rio Style Creamy Tomatillo Salad Dressing
(Makes about 2 1/2 cups of dressing, recipe adapted from a recipe for Cafe Rio Dressing, Chicken, and Rice that I got from my brother-in-law Kelly. See after the main recipe for variations I've tried.)

2 cups prepared Ranch Dressing (I usually use a packet of Hidden Valley Ranch buttermilk mix, but you can make your own Homemade Buttermilk Ranch Dressing or Buttermilk Dressing if you prefer)
1 small bunch cilantro, large stems removed (about 1/2 cup chopped cilantro)
2 large or 4 small tomatillos
1/2 tsp. minced garlic
2 T fresh lime juice
1 tsp. Green Tabasco sauce or 1 diced jalapeno pepper

This dressing is so close to the recipe for the dressing I have found yet! I guess this will do until Cafe Rio decides to come to Indy...hint hint!

Mallory

Monday, July 16, 2012

Teriyaki Rice Bowls

So I had this addiction while in college. Everyday I would go to the cafeteria and since I was going to school at the local community college they had like 4 places to eat. My absolute favorite was Teriyaki Stix. I loved it! I would get the rice bowl with extra terkiyaki sauce...everyday! If you ever find yourself near a teriyaki stix in Utah I would recommend it. Well since I no longer live in Utah and we are trying to save for a house I have had to get creative. Tonight we tried to make our own teriyaki rice bowls and let me just say they were a success! Here is the recipe:

Teriyaki Sauce: (ok I have to admit this isn't my recipe I found it here). I love Our Best Bites! I got their recipe book last year and I have only made 1 recipe that didn't work out. I am embarrassed to say I tried it 3 times. But this teriyaki sauce is to die for!

1 Tbsp. cornstarch
1 Tbsp. cold water
½ c. white sugar
½ c. soy sauce
¼ c. cider vinegar
1 clove garlic, minced
½ tsp. ground ginger
¼ tsp. black pepper
In a medium saucepan, combine sugar, soy sauce, vinegar, garlic, ginger, and black pepper. We’ve talked about ginger before and you can use either ground ginger as directed or about 1 1/4 tsp. of fresh ginger. Believe it or not, in this recipe, I actually prefer ground ginger; it has a slightly different flavor that I think infuses better in the sauce than fresh ginger. That being said, I used fresh here because I had a bunch of minced ginger in my freezer and I didn’t want it to go to waste. And the sauce came out great. So whatever works for you.

 Chicken:
3 Chicken Breasts
Teriyaki Sauce (enough to drizzle over chicken)

Bake 350 for 20-30 minutes or until done

Veggies:
Frozen Stir-Fry Veggies heated

Rice:
I prefer brown but use what your family will eat.


I then layered it brown rice, chicken and veggies.  It was not like what I use to eat in college but seeing as I was yet to be converted to veggies then it was better.

I am loving the possibilities of this recipe. I think it would be totally possible to put it in the crock-pot and it is super easy. I hope you can find an adaptation that works for your family!

Mallory

Friday, June 22, 2012

Fancy Friday: Wavy Hair

I am both blessed and cursed with my hair. Sure, it's thick, it's long, yatta yatta yatta. I hear it often, you're so lucky, I wish I had that....but I don't think most people understand that this type of hair come with a SCROLL of issues.

With the amount of time I have invested in my hair in the last ten years, I could have written a novel to rival the Potter series, sailed around the world mayyyybe four times, and parented and raised the next President of the United States. 

Seriously.

NOTHING is more time consuming. Ask my husband.

For example: When I want to curl my hair, I need an HOUR at least. Comfortably, 90 minutes. None of this, I get up at a normal time and decide, "Oh, I think I'll look cute today." 

No no no nooo...I have to set the alarm and make an extra pot of coffee.
An hour may not seem like much, but try holding your arm at a 90 degree angle above your head for an hour.....you'll get the idea.

So, to combat the time issue (because, let's be honest, my sleep is becoming more important than a pretty do in the morning), I've looked into no heat styling. It's easy, faster (since the styling part take place whilst I'm "zzzzz"-ing), and healthier!

What could be better??


I've tried several styles and waving is definitely a fav of mine.

I used to wave my hair when I was younger. 

We're not talking the sexy beach waves found on every page of the Victoria's Secret bikini catalog....oh no....all of you know what I'm talking about. 

Envision 1999....YOU know what I'm talking about. 

It was either sectioned off pieces that were crimped (yikes), or the bigger waves that were hairsprayed within an inch of their lives. My hair could have got up and walked around by itself.

Ah, high school.

Yay.

Well, although the style may have changed, I still hold a fondness for the wavy look.

What d'ya think?


This will work with long and short, thick or thin hair....however, I will say, if you have shorter hair consider braiding the hair looser....you don't want to look like you had a war with the electrical socket and lost. 

Just sayin'.

You can also change it up with the number of braids you use. However, for my hair I find that two works best.

All you need are:

Two elastics...Woot! Simple!


K, the one skill you need is the know how with a french braid.

Wait! Wait!

For those of you who IMMEDIATELY said, "okay, well I was excited until she brought that up...guess I'll head back to pinterest..." give me a few more minutes.

I PROMISE.

French braiding is NOT. HARD.

It's very similar to curling your own hair, in that, was curling your hair a breeze the first time you attempted it? If you're like me, you ended with more burns on your fingers than curls in your hair.

Like french braiding, it just takes a few times practice. Then you get the feel of it.

AAAAaand, it DOESN'T have to look pretty. Remember? The only one who'll be mocking is your pillow.  If there are lumps, whooo caaaares?


I usually shower at night, so I let my hair air dry until it's just damp, and then french braid it...easy!

Here is a link for some step-by-step instructions on french braiding:

French Braid tutorial

*Hint: for those of you that have bangs, I find that braiding them in is better...this means you have to start the french braid pretty high on your head.*


Go to sleep, and the next morning, spritz your hair with hairspray BEFORE you take the braids out and let it sit for a few. Then, unbraid your hair:


Loosen the waves with your fingers...don't do it too much though, or you'll pull the wave out of your hair a bit.


Once you've got your hair the way you want it, spray with some hairspray, and ta daaaaa!


Thursday, June 14, 2012

Baby Girl Hair Do

I don't know about your baby girl but mine's mane is hard to manage. She has these 2 huge calics in the back of her hair that if I don't get them in a pony they stand up all weird. But the hair in the front is so short that I cant just pull it in to piggy tails or it all falls out. So I have learned to be creative with how I do her hair so it acutally looks like I have done it. Here is one of my recent favorites because it works for all of her hair. 

(Note: My daughter doesn't have hair on the sides of her head (thank you Daddy's side of the family) so I just do it on the top. If your baby has more hair on the sides it would work just fine to include that too!)


First I divide the hair into three parts.


I put the front and the back parts in ponytails.


Then I pull those in to a ponytail in the middle like so.


Then make a cute bun from the hair in the middle. (you could really do whatever you want here but I like the bun the best.


This is what its going to look like from above. See how far back the back section goes.


And your done and your child will love you for the cute hair you have done for her...or not so much in my case.


Thanks for Stopping By
Mal

Wednesday, June 13, 2012

What to Read Wednesday: Matched

I finished the novel Matched by Ally Condie last night...thought I'd write a review in case this book happens to be on anyone's summer reading list. 

Soooooo, perhaps you've heard of a little known story called The Hunger Games. 


Ahem.

Girl lives in totalitarian society.

Girl likes boy from childhood.

Girl is put in situation controlled by society.

Girl hates the totalitarian society.

Girl decides to become a rebel.

Girl meets boy who's allll about being rebellious.

Girl decides she likes him better than first boy.

Together they change the world.


Ahh, Hunger Games in a nutshell. It's become the standard for any dystopian novel out there.

To begin with, I really really wanted to like this book. I loved Hunger Games, and I actually was incredibly fascinated by dystopian society novels long before it became so trendy.

Thank you Suzanne Collins for making these so much more accessible to me.


However... This book? I was kind of disappointed. I won't give away or spoil anything in this review, so please feel free to read this with both eyes open.  And yes, that WAS a Taylor Swift reference.


It begins following the life of Cassia Reyes, a young girl who strives for perfection living in the Society. She's a model citizen who has reached her Matching age. In this society, teens are matched by the governing body to their perfect genetic complement (basically, arranged marriages).

Cassia is Matched and couldn't be happier with her partner. That is, until, she watches the video the Matching department put together for her about her partner.... And someone else's face appears. (whoops)

This begins a chain reaction of events that challenges everything Cassia knows and trusts about the Society....


This is where I'll stop with the story so as to not spoil anything. 

And for those of you who immediately freaked out because I DID give some background, well, that info is on the back of the book. 

Anywho, the book invokes a love triangle (what teen flick doesn't these days? Thank YOU Stephanie Meyer) and a headstrong female lead. While I did like the characters, the Society itself as well as the plot was just too, umm, routine for a dystopian novel.

Nothing really stood out for me.

In addition, I don't know about you, but I could NOT put down Hunger Games. Every chapter had something. Sooo many cliffhangers. Awesome-ness.

Matched dragged. There weren't hardly any climaxes and the ones it had weren't that exciting.


I just realized I'm writing this with a gloomy face and sad eyes. People, THIS is how disappointed I am.


So, that's it. That's where it stands.

Matched is a trilogy and I DO plan on reading the second and third book (I have a thing about that, I'm weird...trust me, Twilight was my Everest).

I'm open to the idea that the story will pick up.

And, I will say, Ally Condie did leave the ending at a "new beginning" or "new phase" in the characters' lives, so you never know. 

This could could blow all other teen flicks out of the water. 

I'll let you know...but until then, what do you think? Any reactions to this book? Am I off my rocker?

Share your thoughts!


Xoxo
Alicia  

Sunday, June 10, 2012

DIY Vest

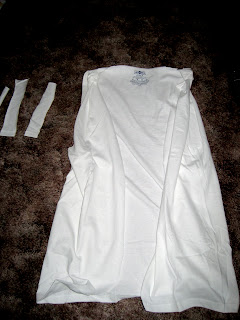
I saw this idea on Pinterest and wanted to try it out, so I bought a $5 t-shirt at Target today and gave it a try. First, take your t-shirt and find the middle.
Cut down the middle and cut off the sleeves

And cut off the collar and taper it to make it look like you want

Use the sleeves to cut some fabric strips. The website said to cut 6 strips, but I only used 4.

The site also only tied the fabric strips around the shoulders and the back, but I ended up sewing them cuz I liked the look better.

It looks a bit cleaner to me.

So you tie and sew the fabric around the shoulders and the back

And there ya go! I need to wash it still to get the wrinkles and starch out so it'll lay better, but this is the basic idea. 

I think it turned out pretty good and it was super easy.


Friday, June 8, 2012

Fancy Friday: Straightener Do


I have ALWAYS loved to do hair. But, the older I get, the less time I have to devote to extravagant dos...

Let's be honest, the snooze button has replaced a LOT of the "do" time.

Yup, happens.


I recently discovered the "technique" of curling hair with a straightener...however...

Ummm, let's just say, my hair isn't the most consistent when it comes to that type of curling. My friends insisted, "Ohhh, it's sooo easy! Took me ten minutes!"

Bahhh.

NOT. so.

I have since dummed down the curled hairdo to a flipped ends style. I kind of stumbled upon the technique accidentally (in a curling attempt fail...ahem), aaand went with it. I was late for work.


Less formal than curls. It's more of an, "I just stepped out of the wind and yes, my hair looks like this" look. Works.

And all you need:


Boo.

Yah.

I will say, this works MUCH better with layers. The more, the better; gives it more body. It also works well with shorter hair. 


And now:

Start with clean hair, completely dry. 

Pin up the top layers. Get 'em out of the way.

Section off a 1-2" portion of hair.


Theeeen, start as you would, straightening your hair. As you near the bottom of the sectioned hair, turn the straightner up until the hair is wrapped around the straightener. Like so:


Don't stop pulling as you turn it, keep it moving so as not to burn your hair. NOT the end goal, people. 

For those of you who have tried the curling technique, yes, this is very similar. Only difference? You don't turn the straightener until you're about a few inches from the ends. 

See? Ta daaa!

Flippy hair!


Repeat this, working your way until all layers are complete. 

Sooooo many layers. Eeesh.


When you're done, spritz with some hairspray, add some body product if needed, and voila!


Until next time!

xoxo,
     Alicia


Wednesday, June 6, 2012

Homemade Birthday Presents: Part One

Over the last few years because of lack of money excess of creativity I have been doing homemade birthday and Christmas presents. Over the last few years I have been scouring the web for ideas for presents. I went here and here and even here with little success. I searched for everything from "homemade presents" even down to "what to make my 31 year old husband for his birthday". Some of the things I found were were fantastic while others were difficult, time consuming, and expensive. Over the next few months I am going to show you some of the ideas that I have come up with that have worked and were not too expensive

While searching oneprettything.com and ravelry...seriously if your not a member become one today then learn how to crochet because its awesome and you will be addicted. I found a pattern for a crochet hot pad. I bookmarked the pattern and thought about it for a good long time.

Lots of thoughts crossed my mind:
Is it lame?
Is this something that my grandmother would give me for a birthday?
Would I seem like a grandma giving it?
What if people don't like it?
What if people don't cook?

Then I stopped thinking and started making. Yes these hot pads are something my grandma would give out but who cares. I have yet to meet someone who didn't say at one point or another "I really could use a hot pad or two right now." I also found fun colors and yarn for my hot pads unlike the black and gray ones that I used at my mothers house for years (given to her for her wedding from one of my Grandma's friends). BTW they are my mother's favorite hot pads and are the most used in her home.  For my hot pads I buy Sugar and Cream cotton yarn. I have found some similar cotton yarn at Micheal's for like $1.00 per skein. Each hot pad takes one skein so that is like a 2 buck birthday present. In my book that makes this present pretty rockin'. If you wanted to spend a little more always attach it to a box of brownie mix or if your feeling very creative make a mason jar with a cookie mix in it like this.

Before I start there are a few things you need to know about crochet before you start. You will be using 2 kinds of stitches for this pattern a SC (single crochet). If you are new to crochet there are tons of videos online that will help you learn how to start and finish. This project is simple enough that most people could do it.

Starting Out-http://www.youtube.com/watch?v=3NcOewm7qAA
Chain-http://www.youtube.com/watch?v=OtmOEzm_OXQ
Single Crochet- http://www.youtube.com/watch?v=OqhaQQajt0U

I started with this pattern but found out that the hot pad was all to small and difficult to use. Here is my revised pattern:

Single Crochet 37, Turn.
1: In 2nd chain from hook single crochet in each stitch (only going through front loop) repeat till end of row. On last stitch single crochet 2 times in stitch. Now single crochet in back loops so you will have a continuous round (note do not do 2 stitches in last loop).
2-20: single crochet in all stitches around. (Note:Only crochet around until the two edges meet.  Depending on how loosely or tightly you crochet you may need more or less rows.)


This will make the pot holder look like a large pocket (pictured above). Turn the pocket in on itself so that it looks like the 2nd picture down. Then take your tapestry needle and sew the opening closed.

Now you have an amazing birthday or Christmas present to give away.

Monday, June 4, 2012

Well Hullo! I'm Brittany

Once Upon a Time, a baby girl named Brittany was born in Salt Lake City, Utah; to loving parents.

As she grew she developed a love for all things girly: lace and ruffles were her best friends. She also developed a love for music, cooking, dancing, singing, reading and making pretty things.

In high school, she got a job at a dry cleaner where she became best friends with Alicia and Mallory.

Together, they had many adventures. They went dancing and had campfire cookouts. They had fashion photo-shoots and explored the city. They bore their hearts to one another. They rejoiced in each others' triumphs and cried together through heartbreaks. And though their lives took them in separate directions, they stayed best friends.

After high school, Brittany went on to college where she had many other adventures and made another best friend. His name was Robby. Over the years, Brittany and Robby stayed best friends and eventually decided to be best friends for eternity.
They got married in the Salt Lake temple and a little over a year later became parents to the sweetest baby boy named John.


Although Brittany's story is far from over, it seems like a good start to living Happily Ever After.